 Stamp Sets:
* Greeting Card Kids
* Scenic Season
Techniques:
* Brayering
* Masking
Cardstocks:
* Whisper White
* Early Espresso
* Baja Breeze
Ink Pads:
* Stazon Black (Girl)
* Early Espresso (Trees)
* Real Red (Greeting)
* Baja Breeze (Skyline)
Markers:
* Marina Mist
* Wild Wasabi
* Real Red
* Daffodil Delight
Accessories:
* Brayer (skyline)
* White Gel Pen (snow)
* Punch
* Scallop Trim Corner
* Big Shot
* Textured Impressions - Vintage Wallpaper
* Vanilla Shimmer Smooch (all over for snow) & Color Catcher
* Frost White Shimmer Paint (dress trim)
* 5/8" Grosgrain Real Red Ribbon
* 1/8" Taffeta Marina Mist Ribbon
* Dimensionals
* Mini Glue Dots
* Grid Paper
* 1 1/4" Circle Punch
* NSU - Post-it Notes
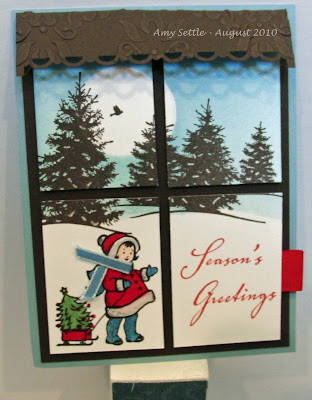
General steps below, I can post up more detailed steps/dimensions later if anyone is interested.
- Mask the moon & tree line then brayer skyline - I went to Michelle Zindorf's brayering classes - so awesome and I wanted to incorporate it some how!!
- Stamped the trees, added snow with white gel pen
- Spray the shimmer smooch in the color catcher
- Stamped the girl in the very bottom left corner - love clear mount!!
- Colored the girl and used a tiny paint brush to apply shimmer paint to trim - let dry!!
- Cut into quarters
- Punched holes for her ribbon scarf and looped it through
- Stamp greeting on the bottom right corner piece (again love clear mount, I cut my greeting in half and mounted them on the same block in the format I needed)
- Added folded ribbon to back of the bottom right corner piece
- Mounted on to Early Espresso layer using dimensionals
- Embossed Early Espresso strip, punch, cut to size, score, mount on card layer
- Mounted to Marina Mist
- Voila! :)
To make it easier for myself, I had drawn up some guides on my Grid Paper.
 | |||||
| 2) Close up of the brayer / masking section. |
 | |||
| 3) My stamping section where I had my cut lines marked so I could get the tree into a bit of the bottom left panel but leave enough room for the girl's head. |
 | ||
| 4) This shows where I even draw lines for where my white CS and clear block would go. |
I hope you enjoyed this post and my first (of hopefully many) creation in quite awhile. I am considering making more of these for the Baltimore Regional swap - if you are going and would be interested, let me know.


6 comments:
Beautifully done! Thanks for a very descriptive How To.
WOW your card is beautiful, Hallmark wishes they were you.
Absolutely Beautiful! Thanks for sharing.
What a beautiful and creative card. Thank you so much for sharing your talent.
Lovely card! You did an awsome job discribing your technique. I look forward too more in the future. Thanks, Susan.
i love this card thank you for sharing i just order this set cant wait to play with it.
www.melissastampingvoila.blogspot.com
Post a Comment