Hello!
For now, I've moved my blogging over to http://carsandcrafts.blogspot.com as my 'crafty' life has expanded beyond just stamping and scrapbooking. Hope to see you there!

Wednesday, January 14, 2015
Monday, November 22, 2010
Specials!
50% Off Starter Kit Promotion
Now is an excellent time to sign up as a Demonstrator with Stampin' Up! with the amazing deals they are offering on the Starter Kits. You can get the Starter Kit for 1/2 off! Click HERE to find out more information and then to join, select the Join Now button on the left side of the screen. You will need my recruit authorization password which is: StampingAndScrappingWithAmy
Online Spectacular!
For nine days only—November 22-30—get FREE SHIPPING on orders over $150! Plus you can save up to 50 percent off select Stampin’ Up!® products—including My Digital Studio software and Designer Fabric!
Visit my Online Store to see the complete list of discounted items.
Monday, October 4, 2010
A tip from Baltimore Regionals
I attended the Stampin' Up Regional event in Baltimore on Friday with my upline. We stayed Thursday night at the Hyatt (it is a beautiful place and I would definitely go back) and attended the event on Friday. I made 60 swaps and they are all gone! I'll post pictures soon. For now, I had to share this tip I learned from someone seated at my table which a lot of you probably already know.... Keep a container of dental floss with your stamping supplies! It is a great way to remove a layer that was glued down to another layer without ruining that top layer. I used to use a bone folder for this, but some times that can leave a fold but the dental floss works great!
Thanks for stopping by!

Thanks for stopping by!
Tuesday, September 21, 2010
Family Apple Tree
My son's preschool class is sharing about family this week. The teacher asked us to figure out what type of tree best represents our family and then provided a tree template that we had to build a family tree with. We like to eat apples (fuji) quite a bit so that is what we picked.
I googled stampin up punch apple as my starting point and found Sophia's tutorial from Andrew Walford's blog for creating a punch apple. The tree template the teacher provided was a regular letter size paper so I had to scale down from the size of Sophia's apples.

I used the new 2 1/2" circle punch as my base instead and the leaves were made with the 1" circle punch. Other changes include using the Word Window punch as my stem as I tired to freehand it and it didn't look so great. I did freehand the trunk and branches and ran it through the Square Lattice embossing folder for some additional texture. I sponged the tree around the branches in Chocolate Chip. My son put the apples on the tree using dimensionals. We had to add a family banner so I used the new Decorative Label punch and then used a strip of cardstock left over from making the leaves to make the grass. (The photo was edited to remove my family's names from the other apples.)
Click Here if you do not have a demonstrator and would like to order items from the supply list through me:
Cardstock: Always Artichoke (105119), Chocolate Chip (102128), Real Red (102482), Very Vanilla (101650), Whisper White (100730), & Kiwi Kiss (retired so substitute Certainly Celery 105125 or Pear Pizzazz 119795)
Classic Ink: Always Artichoke (105219), Bravo Burgandy (105214), & Chocolate Chip (100908)
Markers: Chocolate Chip (100071) - I drew the veins on the leaves as it didn't come out as well for me using the Hobby Blade.
Punches: 1/8" Circle (Retired, but can use the Crop-A-Dile 108362), 1" Circle (119868), 2 1/2" Circle (New in Holiday 2010 Mini 120906), Decorative Label (New in Holiday 2010 Mini 120907), Full Heart (119883), & Word Window (119857)
Tools & Supplies:
Big Shot (113439), Square Lattice Embossing Folder (119976), Stamping Sponges (101610), SNAIL Adhesive (104332), Stampin' Dimensionals (104430)
Thanks for stopping by!
Amy
Monday, August 23, 2010
My new swaps!
Welcome, thanks for stopping by! My new swaps were finally shipped out the door and here they are!!! Now they may look a bit familiar, but I cased myself from the same swap last year because I really liked the layout!! I also took the ice cream parlor awning and turned it into a curtain valance.
 Stamp Sets:
* Greeting Card Kids
* Scenic Season
Techniques:
* Brayering
* Masking
Cardstocks:
* Whisper White
* Early Espresso
* Baja Breeze
Ink Pads:
* Stazon Black (Girl)
* Early Espresso (Trees)
* Real Red (Greeting)
* Baja Breeze (Skyline)
Markers:
* Marina Mist
* Wild Wasabi
* Real Red
* Daffodil Delight
Accessories:
* Brayer (skyline)
* White Gel Pen (snow)
* Punch
* Scallop Trim Corner
* Big Shot
* Textured Impressions - Vintage Wallpaper
* Vanilla Shimmer Smooch (all over for snow) & Color Catcher
* Frost White Shimmer Paint (dress trim)
* 5/8" Grosgrain Real Red Ribbon
* 1/8" Taffeta Marina Mist Ribbon
* Dimensionals
* Mini Glue Dots
* Grid Paper
* 1 1/4" Circle Punch
* NSU - Post-it Notes
General steps below, I can post up more detailed steps/dimensions later if anyone is interested.
To make it easier for myself, I had drawn up some guides on my Grid Paper.

 Stamp Sets:
* Greeting Card Kids
* Scenic Season
Techniques:
* Brayering
* Masking
Cardstocks:
* Whisper White
* Early Espresso
* Baja Breeze
Ink Pads:
* Stazon Black (Girl)
* Early Espresso (Trees)
* Real Red (Greeting)
* Baja Breeze (Skyline)
Markers:
* Marina Mist
* Wild Wasabi
* Real Red
* Daffodil Delight
Accessories:
* Brayer (skyline)
* White Gel Pen (snow)
* Punch
* Scallop Trim Corner
* Big Shot
* Textured Impressions - Vintage Wallpaper
* Vanilla Shimmer Smooch (all over for snow) & Color Catcher
* Frost White Shimmer Paint (dress trim)
* 5/8" Grosgrain Real Red Ribbon
* 1/8" Taffeta Marina Mist Ribbon
* Dimensionals
* Mini Glue Dots
* Grid Paper
* 1 1/4" Circle Punch
* NSU - Post-it Notes
General steps below, I can post up more detailed steps/dimensions later if anyone is interested.
- Mask the moon & tree line then brayer skyline - I went to Michelle Zindorf's brayering classes - so awesome and I wanted to incorporate it some how!!
- Stamped the trees, added snow with white gel pen
- Spray the shimmer smooch in the color catcher
- Stamped the girl in the very bottom left corner - love clear mount!!
- Colored the girl and used a tiny paint brush to apply shimmer paint to trim - let dry!!
- Cut into quarters
- Punched holes for her ribbon scarf and looped it through
- Stamp greeting on the bottom right corner piece (again love clear mount, I cut my greeting in half and mounted them on the same block in the format I needed)
- Added folded ribbon to back of the bottom right corner piece
- Mounted on to Early Espresso layer using dimensionals
- Embossed Early Espresso strip, punch, cut to size, score, mount on card layer
- Mounted to Marina Mist
- Voila! :)
To make it easier for myself, I had drawn up some guides on my Grid Paper.
 |
1) This is most of it, shows my top part indicates my marking spots and also where I did so much brayering for the swap that it ultimately ripped through. The bottom part is where I stamped, and the right had my cutting notes. |
 | |||||
| 2) Close up of the brayer / masking section. |
 | |||
| 3) My stamping section where I had my cut lines marked so I could get the tree into a bit of the bottom left panel but leave enough room for the girl's head. |
 | ||
| 4) This shows where I even draw lines for where my white CS and clear block would go. |
I hope you enjoyed this post and my first (of hopefully many) creation in quite awhile. I am considering making more of these for the Baltimore Regional swap - if you are going and would be interested, let me know.
Friday, July 23, 2010
New Site!
Yes, you have arrived at the correct destination! I have moved my stamping and scrapbooking blog to a new location. I hope to keep this more updated and share with you my latest creations.
I am moving from traditional scrapbooking to a more digital / hybrid format. I LOVE SU's My Digital Studio (MDS) as it allows me to get my SU 'fix' with coordinating colors for all of the digital pictures that I take.
Speaking of MDS - what do you think of the shopping cart icon to the right? I used the Scallop & Circle Punches, Silver and Filigree brads, Grosgrain Ribbon Bow, and Vintage Overlay stamp to customize the free cart logo I found online.
This weekend I hope to play with my new stamp sets for a swap that I joined due in a few weeks. :)
Friday, April 23, 2010
My MDS Projects
A couple of MDS pages I did lately.... I was trying to do them quickly for a couple of different reasons. I normally like to do 2 page spreads so hope to have those up soon. I'm going to be scrapbooking all day on 5/13 & 5/14 - can't wait!!!


Friday, April 2, 2010
My Digital Studio (MDS)
I've been playing with the Stampin Up - My Digital Studio software and love it! I'll be posting my layouts soon. My goal is to start using this to catch up on my scrapbooking from the last 3 years :). Please check back soon!
Wednesday, August 5, 2009
100 Card Swap - Scenic Season
Scenic Season

Card Stock:
• Whisper White 8.5 x 5.5 (A2) and 3.5 x 4.5
• Bordering Blue 3.75 x 5
• Night of Navy 4 x 5.25
Ink Pads: Bordering Blue, Night of Navy, and VersaMark
Accessories: Paper Cutter, Brayer, Stamping Sponge, Bone Folder,
The Tearing Edge, 1 3/8” Punch, Iridescent Ice Embossing Powder,
White Gel Pen, Dimensionals, and ¼” Night of Navy Grosgrain ribbon
NSU: Post-It Notes
Inspirations:
This card was inspired by a combination of items on the SCS gallery. The colors were from items in the Lovely as a Tree section and the layout from a 5th Avenue Floral card. I'll try and find time to pull some specific links and references here so I can give additional credit.
Sunday, January 4, 2009
Reorganizing
So I haven't been posting much because I've been busy reorganizing my office / stamping room and working on getting my Christmas cards / projects out. I was running so late with those cards that I don't remember if I took pictures, but I'll try and see if I can scrounge them up and post more details soon! I'm also working on unmounting my stamp sets which is taking a long time as well.
Here is one section of my room now - although the shelf has since filled up a lot more:


Thursday, October 30, 2008
Project for daycare
I made a bunch of these tonight for my son's day care friends. I used the Top Note die (which I love)! I don't know how I fooled myself into thinking for the longest time that I did not need a Bit Shot. I'm totally in love with it!!

Hint: I saw a sample in our magazine using the Eat, Drink, & Be Scary stamp w/o the border around it. The first pilot one I did, I used a marker. When I sat down to make it tonight, I thought I was going to go crazy doing that to make 17 of them and I realized I could make a mask and then use an ink pad. That saved so much time!!!


Supplies:
Cardstock: Tangerine Tango, Whisper White
Ink: Basic Black, Kiwi Kiss
Ribbon: 1/4" Basic Black Grosgrain
Stamp Set: Eat, Drink & Be Scary
Tools: Big Shot w/Top Note die
Misc: Sticky Strip, Clear bag, & Nemo gummies
Cardstock: Tangerine Tango, Whisper White
Ink: Basic Black, Kiwi Kiss
Ribbon: 1/4" Basic Black Grosgrain
Stamp Set: Eat, Drink & Be Scary
Tools: Big Shot w/Top Note die
Misc: Sticky Strip, Clear bag, & Nemo gummies
Hint: I saw a sample in our magazine using the Eat, Drink, & Be Scary stamp w/o the border around it. The first pilot one I did, I used a marker. When I sat down to make it tonight, I thought I was going to go crazy doing that to make 17 of them and I realized I could make a mask and then use an ink pad. That saved so much time!!!

Friday, October 24, 2008
Birthday Cards
I have a birthday party to attend tomorrow for two little girls that are turning two! I made two birthday cards which I CASED from a card found on the web by a lady named Ruth Hinds. I only changed a little bit of the dimensions and the image that was used.
I need to make a few more of these to have on hands for birthdays! My only sad part is that this paper is retired and I'm a paper hoarder so it is going to be hard to part with this paper!
 |
I need to make a few more of these to have on hands for birthdays! My only sad part is that this paper is retired and I'm a paper hoarder so it is going to be hard to part with this paper!
Monday, October 13, 2008
Halloween Prep & Stuff
So here is a picture of the card I made for the 100 card swap that I had joined. I didn't think this was going to be hard to make, but after making 100 - I realized differently!!! Wow, the swaps I got back though were just AMAZING. Everyone did such a fabulous job. I actually had issues getting mine done and wouldn't have if my husband hadn't actually ended up helping me assemble at the end. I had started having really horrible morning sickness (all day!) after I signed up for the swap and was sick for over a month and then ended in a horrible cold / cough / chest congestion for over another month (which I'm still recovering from).
Okay- so here is the picture of the swap using the new SU set Two Cool Dudes. It was based on the sample shown in the catalog with a bit more embellishment:
Halloween card we made at my UL's camp and I CASE'd it. I love this card and the candy corn is made with Crystal Effects for dimension. I really like CE - just takes awhile to dry!
Simple Card - This was based on a card we made maybe a year ago at my 5 level up's event. I liked how simple it comes out, although its not quite as quick to make!
The colors of this card was inspired from the same event as the card above. I would never have thought to do this combination on my own. The different layers were inspired on cards on SCS. I love those ribbon sliders!
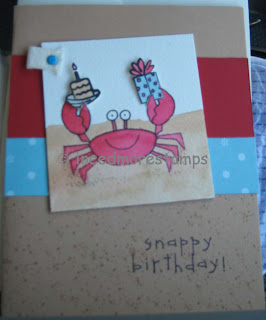
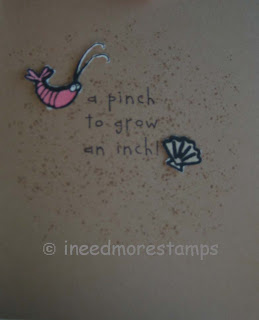
This card I just gave away as a birthday card. We made this at my UL's house a long time ago when Crab & Co was first in a mini. I'm so glad they brought this set back - I didn't buy it when it was in the mini, but you better believe I have it now! Now that I've given this card away, I've gotta make another one to replace it :)
Okay- so here is the picture of the swap using the new SU set Two Cool Dudes. It was based on the sample shown in the catalog with a bit more embellishment:

Here are some of the other stuff I made to send to the hostess as both a thank you and an apology because I was short 2 for the swap (I can't count) and it took me forever to get them out the door because of said illness above.


Top Note - Halloween - this is the front and back of what I did with the top note. The ribbon is more green, but it didn't show up in the picture too well. The front was from the SU samples using the new stamp set and the back is using a Sizzix Halloween Die. I think this is what I'll be using to give to my son's classmates for Halloween.


Halloween card we made at my UL's camp and I CASE'd it. I love this card and the candy corn is made with Crystal Effects for dimension. I really like CE - just takes awhile to dry!

Simple Card - This was based on a card we made maybe a year ago at my 5 level up's event. I liked how simple it comes out, although its not quite as quick to make!

The colors of this card was inspired from the same event as the card above. I would never have thought to do this combination on my own. The different layers were inspired on cards on SCS. I love those ribbon sliders!

This card I just gave away as a birthday card. We made this at my UL's house a long time ago when Crab & Co was first in a mini. I'm so glad they brought this set back - I didn't buy it when it was in the mini, but you better believe I have it now! Now that I've given this card away, I've gotta make another one to replace it :)


Wednesday, August 6, 2008
Best Upline Ever!
My UL is awesome! :) She ordered the catalog (I'm only getting 1/2 a box from her) and it arrived yesterday. I was bummed because we were going to be in the Tysons area last night, but not able to get all the way to her place. Well she ended up coming out to Tysons and had my new catalog with her!! Sweet sweet joy - I LOVE all the new stuff!!!!!
Thursday, July 31, 2008
Unmounting Instructions
Alright, so here is how I unmount my stamps - I did tons of research on SCS on the different options before deciding on this path with my added twist to use the stickers.
Please note the following disclaimer: I make no claims on how well this method works for anyone else but me. If you intend to use this method, I suggest doing a test batch first as I've only had time to really use my method for a few weeks so I make no claims on the long lasting effect of this method and touch-ups of the adhesive may be necessary.
This is also a very time consuming process - although most of it is due to my neurotic nature and needing the index sheet just right for me.
If you end up using this method please drop me a comment and let me know, I'd love to hear how it worked for you.
------------------------------------------------------------------------------------------------
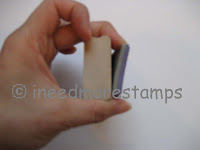
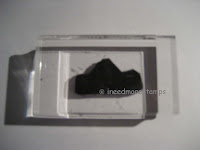
Step 1: Unmount the stamp from the woodblock
(This can be skipped if you are using brand new unmounted rubber - which actually works the best). You can remove the rubber from the wood and if it is really stuck, stick it in the microwave and zap it for a few seconds.
(Note: Click on any image to get a closer view)
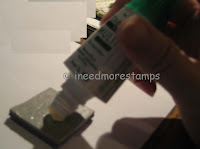
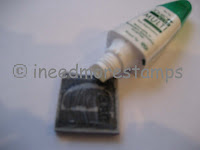
Step 2: Apply the tombo multi pretty liberally to the foam side of the stamp. Remove the sticker from the wood block and adhere it to the rubber. Make sure you use enough glue as you do not want your sticker to stick to your acrylic block later. Make sure you join the two pieces together before the glue dries as you want to use the permanent adhesive.

Please note the following disclaimer: I make no claims on how well this method works for anyone else but me. If you intend to use this method, I suggest doing a test batch first as I've only had time to really use my method for a few weeks so I make no claims on the long lasting effect of this method and touch-ups of the adhesive may be necessary.
This is also a very time consuming process - although most of it is due to my neurotic nature and needing the index sheet just right for me.
If you end up using this method please drop me a comment and let me know, I'd love to hear how it worked for you.
------------------------------------------------------------------------------------------------

Step 1: Unmount the stamp from the woodblock
(This can be skipped if you are using brand new unmounted rubber - which actually works the best). You can remove the rubber from the wood and if it is really stuck, stick it in the microwave and zap it for a few seconds.
(Note: Click on any image to get a closer view)
------------------------------------------------------------------------------------------------
Step 2: Apply the tombo multi pretty liberally to the foam side of the stamp. Remove the sticker from the wood block and adhere it to the rubber. Make sure you use enough glue as you do not want your sticker to stick to your acrylic block later. Make sure you join the two pieces together before the glue dries as you want to use the permanent adhesive.


------------------------------------------------------------------------------------------------
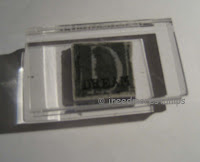
Step 3: Apply adhesive to the sticker and let dry (this is to use the repositionable version of the adhesive). I like to apply a second coat after it has dried to give it a little better sticking power. Make sure all layers are completely dried before using it on an acrylic block.
Step 3: Apply adhesive to the sticker and let dry (this is to use the repositionable version of the adhesive). I like to apply a second coat after it has dried to give it a little better sticking power. Make sure all layers are completely dried before using it on an acrylic block.

------------------------------------------------------------------------------------------------
Step 4: Make the index sheet
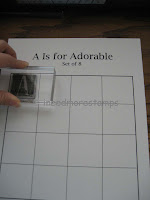
(I debated many methods on doing this, including using the scans of the sticker sheet before deciding on this method. I wanted to be able to see the stamped image next to my image so I don't have to look for it backwards and I wanted to know what goes where when I'm done. The most complicated part is making the boxes sized to fix the different sized stamps. (At the Races was a pain to do!). At the end though I'll have a nice collection of templates to use (I told my UL, I'd share it w/her if she ever decided to go this route).
Step 4: Make the index sheet
(I debated many methods on doing this, including using the scans of the sticker sheet before deciding on this method. I wanted to be able to see the stamped image next to my image so I don't have to look for it backwards and I wanted to know what goes where when I'm done. The most complicated part is making the boxes sized to fix the different sized stamps. (At the Races was a pain to do!). At the end though I'll have a nice collection of templates to use (I told my UL, I'd share it w/her if she ever decided to go this route).


------------------------------------------------------------------------------------------------
Step 5: Laminate
This took awhile to figure out how to do. My xryon was making a mess of putting two layers together. Then I discovered Xyron sells just straight up laminate sheets w/o using the machine. This also took some practice and now I have it down - just make sure to use a ruler to smooth it out as you laminate. The completed project and other samples:


------------------------------------------------------------------------------------------------
I have to say I love this method and it works great for ME!! This is what I used to make my swaps for convention. I was able to get the boat and the sentiment on one block. The concidence was that the block was the exact same size as the layer as I was stamping on. I love having the sticker sheet on it where I can see it so I feel like I'm getting straighter images.

------------------------------------------------------------------------------------------------
Alternative:
This is the other way to do it with the EZ Mount Thin: it is a MUCH QUICKER method, but I just can't seem to make myself go this route. Although now I have 40 sheets of ezmount eep!
Step 5: Laminate
This took awhile to figure out how to do. My xryon was making a mess of putting two layers together. Then I discovered Xyron sells just straight up laminate sheets w/o using the machine. This also took some practice and now I have it down - just make sure to use a ruler to smooth it out as you laminate. The completed project and other samples:


I have to say I love this method and it works great for ME!! This is what I used to make my swaps for convention. I was able to get the boat and the sentiment on one block. The concidence was that the block was the exact same size as the layer as I was stamping on. I love having the sticker sheet on it where I can see it so I feel like I'm getting straighter images.

------------------------------------------------------------------------------------------------
Alternative:
This is the other way to do it with the EZ Mount Thin: it is a MUCH QUICKER method, but I just can't seem to make myself go this route. Although now I have 40 sheets of ezmount eep!

------------------------------------------------------------------------------------------------
The reason I'm doing this: my stamp sets overfloweth!!! One day I'll post the disaster known as before and hopefully the wonderfully organized after.
Edit 08/06/2008 - Okay was doing my usual SCS viewing and came across this post again - I 'think' this is where I originally got this idea from so I want to make sure I give credit appropriately: http://www.splitcoaststampers.com/forums/showpost.php?p=9639430&postcount=2.
Sunday, July 27, 2008
Swap Details
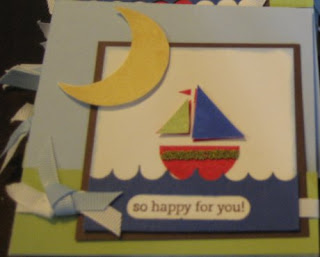
The Swap:
 (I think I need to put a SU trademark or logo on here though - going to research now)
I'm pretty excited about this swap - I worked really hard on getting the design right and putting a lot of effort into making a good convention swap quality. I hope the recipients are not disappointed. If you are here visiting my page as a result of receiving my card as a swap, please drop me a comment and let me know how you liked it (but please be gentle with my feelings)!
Idea:
The first challenge was finding a stamp set that wasn't retired in my collection that I could work with. I debated between Priceless and this set. Eventually this set won out with the design idea.
Inspirations:
So the inspiration for this swap came from two different sources. It was originally supposed to be a a traditional size card for 4.25 x 5.5 based on a card I had received from my SCS Demo Secret Sis in one of the rounds. Michelle is just awesome and I love her work!!!! Try as I could, I could not get this card to really work with the bigger layout as it left a lot of space that I was trying to fill with things such as the little star in versamark or in more blue. Neither really turned out too well so I did some research on SCS and read up on square card sizes which is what I ended up with. The 3-D effect of the boat came from the SCS gallery for this stamp set.
Supplies:
This card was pretty easy to use for covering up mistakes. For instance, some of the cards have the small beads from the green bead duo on the bottom piece of the boat as the white pen didn't provide consistent coverage. I also used So Saffron on either Whisper White or So Saffron for the sun. I ran out of textured Brilliant Blue CS for the last few so some of them may be just pain Brilliant Blue.
Tips, Tricks, and Lessons Learned:
I did show my husband my card and he wondered A) why I was spending all this time on these swaps instead of doing my graduate homework. B) Why I used a moon when it looked like it was day light out. This second piece has really made me question the design. I had to explain to him that I didn't have any Sun stamps that weren't retired. He said you didn't have any circles? Anyway, it was difficult to explain. I debated using the star stamp and star punch which would've been a lot easier then cutting up those moons, but I liked the moon better.
Thanks to Marilyn for being such a good friend to take my swaps for me!!!!
 (I think I need to put a SU trademark or logo on here though - going to research now)
I'm pretty excited about this swap - I worked really hard on getting the design right and putting a lot of effort into making a good convention swap quality. I hope the recipients are not disappointed. If you are here visiting my page as a result of receiving my card as a swap, please drop me a comment and let me know how you liked it (but please be gentle with my feelings)!
Idea:
The first challenge was finding a stamp set that wasn't retired in my collection that I could work with. I debated between Priceless and this set. Eventually this set won out with the design idea.
Inspirations:
So the inspiration for this swap came from two different sources. It was originally supposed to be a a traditional size card for 4.25 x 5.5 based on a card I had received from my SCS Demo Secret Sis in one of the rounds. Michelle is just awesome and I love her work!!!! Try as I could, I could not get this card to really work with the bigger layout as it left a lot of space that I was trying to fill with things such as the little star in versamark or in more blue. Neither really turned out too well so I did some research on SCS and read up on square card sizes which is what I ended up with. The 3-D effect of the boat came from the SCS gallery for this stamp set.
Supplies:
- Stamp Set:
- Nursery Necessities
- Cardstock:
- Bashful Blue (4.25 x 4.25)
- Certainly Celery (4.25 x 1.25)
- Chocolate Chip (3.25 x 3.25)
- Whisper White (3 x 3)
- Brilliant Blue - Textured (3 x 1.25)
- Whisper White or So Saffron for the moon cutout.
- Inks:
- Real Red
- Brilliant Blue
- Certainly Celery
- Chocolate Chip
- So Saffron
- Ribbons:
- 1/4" Grosgrain: Whisper White
- 1/4" Grosgrain: Bashful Blue
- Miscellaneous:
- Word Window Punch
- Snail Adhesive
- White Pen
- Paper Snips
- Stampin' Dimensionals
- Green Bead Duo (only on some cards)
This card was pretty easy to use for covering up mistakes. For instance, some of the cards have the small beads from the green bead duo on the bottom piece of the boat as the white pen didn't provide consistent coverage. I also used So Saffron on either Whisper White or So Saffron for the sun. I ran out of textured Brilliant Blue CS for the last few so some of them may be just pain Brilliant Blue.
Tips, Tricks, and Lessons Learned:
- Dimensionals were easier to use when they were cut up in half and the edges also were not wasted.
- Better trick is to actually cut up a whole strip of the dimensionals in half before even unpeeling the first layer.
- Make a guide for the word window punch on a bigger sheet of cardstock and just secure the smaller wave ones onto it and punch.
- Mark the bottom of the punch with a small piece of tape/cs so the waves can be punched at consistent places easier.
- It took a LONG time to cut and assemble all of the pieces, way more then I was thinking it would.
- So I don't usually use my textured CS (I'm more of a hoarder of supplies then a user), so I didn't realize until I was half way through that there is a front and a back of the textured CS. So some of the Brilliant Blue may be using the wrong side - sorry!
I did show my husband my card and he wondered A) why I was spending all this time on these swaps instead of doing my graduate homework. B) Why I used a moon when it looked like it was day light out. This second piece has really made me question the design. I had to explain to him that I didn't have any Sun stamps that weren't retired. He said you didn't have any circles? Anyway, it was difficult to explain. I debated using the star stamp and star punch which would've been a lot easier then cutting up those moons, but I liked the moon better.
Thanks to Marilyn for being such a good friend to take my swaps for me!!!!
My Convention Swaps
 Well, I'm not going to Convention this year. My UL and I thought very hard about this and we were very tempted to go as this was the 20 year celebration and we wanted to see the new catalog! However, after we priced out - we decided that the money would be better spent on new stamp sets! I do have a friend that is going and I'm very thankful that she was willing to do some swapping for me. I've spent the past few days doing nothing but making these swaps and boy am I exhausted. I'm only sending 45 off to be swapped and keeping 2. The original goal was to make 50 but this was close enough. The output is above and I'm pretty pleased with how they turned out, I'll make another post with the instructions and details.
Thursday, July 24, 2008
Hello World!
Another blog?!?! Seriously, you are asking yourself how many blogs does a girl really need? Well I'm hoping to keep the focus of this one strictly on the happenings of my stamping projects.
The first order of business is my office / craft room is a disaster!! I'm in the process of switching over to unmounted in order to alleviate the mess. I'll post some pictures of the process as we go along.
The first order of business is my office / craft room is a disaster!! I'm in the process of switching over to unmounted in order to alleviate the mess. I'll post some pictures of the process as we go along.
Subscribe to:
Posts (Atom)