
Please note the following disclaimer: I make no claims on how well this method works for anyone else but me. If you intend to use this method, I suggest doing a test batch first as I've only had time to really use my method for a few weeks so I make no claims on the long lasting effect of this method and touch-ups of the adhesive may be necessary.
This is also a very time consuming process - although most of it is due to my neurotic nature and needing the index sheet just right for me.
If you end up using this method please drop me a comment and let me know, I'd love to hear how it worked for you.
------------------------------------------------------------------------------------------------

Step 1: Unmount the stamp from the woodblock
(This can be skipped if you are using brand new unmounted rubber - which actually works the best). You can remove the rubber from the wood and if it is really stuck, stick it in the microwave and zap it for a few seconds.
(Note: Click on any image to get a closer view)
------------------------------------------------------------------------------------------------
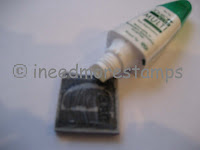
Step 2: Apply the tombo multi pretty liberally to the foam side of the stamp. Remove the sticker from the wood block and adhere it to the rubber. Make sure you use enough glue as you do not want your sticker to stick to your acrylic block later. Make sure you join the two pieces together before the glue dries as you want to use the permanent adhesive.


------------------------------------------------------------------------------------------------
Step 3: Apply adhesive to the sticker and let dry (this is to use the repositionable version of the adhesive). I like to apply a second coat after it has dried to give it a little better sticking power. Make sure all layers are completely dried before using it on an acrylic block.
Step 3: Apply adhesive to the sticker and let dry (this is to use the repositionable version of the adhesive). I like to apply a second coat after it has dried to give it a little better sticking power. Make sure all layers are completely dried before using it on an acrylic block.

------------------------------------------------------------------------------------------------
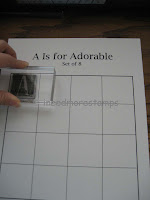
Step 4: Make the index sheet
(I debated many methods on doing this, including using the scans of the sticker sheet before deciding on this method. I wanted to be able to see the stamped image next to my image so I don't have to look for it backwards and I wanted to know what goes where when I'm done. The most complicated part is making the boxes sized to fix the different sized stamps. (At the Races was a pain to do!). At the end though I'll have a nice collection of templates to use (I told my UL, I'd share it w/her if she ever decided to go this route).


------------------------------------------------------------------------------------------------
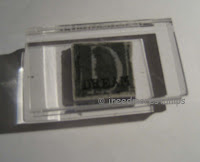
Step 5: Laminate
This took awhile to figure out how to do. My xryon was making a mess of putting two layers together. Then I discovered Xyron sells just straight up laminate sheets w/o using the machine. This also took some practice and now I have it down - just make sure to use a ruler to smooth it out as you laminate. The completed project and other samples:


------------------------------------------------------------------------------------------------
I have to say I love this method and it works great for ME!! This is what I used to make my swaps for convention. I was able to get the boat and the sentiment on one block. The concidence was that the block was the exact same size as the layer as I was stamping on. I love having the sticker sheet on it where I can see it so I feel like I'm getting straighter images.

------------------------------------------------------------------------------------------------
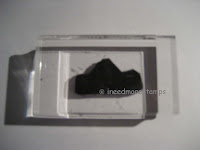
Alternative:
This is the other way to do it with the EZ Mount Thin: it is a MUCH QUICKER method, but I just can't seem to make myself go this route. Although now I have 40 sheets of ezmount eep!
Step 5: Laminate
This took awhile to figure out how to do. My xryon was making a mess of putting two layers together. Then I discovered Xyron sells just straight up laminate sheets w/o using the machine. This also took some practice and now I have it down - just make sure to use a ruler to smooth it out as you laminate. The completed project and other samples:


I have to say I love this method and it works great for ME!! This is what I used to make my swaps for convention. I was able to get the boat and the sentiment on one block. The concidence was that the block was the exact same size as the layer as I was stamping on. I love having the sticker sheet on it where I can see it so I feel like I'm getting straighter images.

------------------------------------------------------------------------------------------------
Alternative:
This is the other way to do it with the EZ Mount Thin: it is a MUCH QUICKER method, but I just can't seem to make myself go this route. Although now I have 40 sheets of ezmount eep!

------------------------------------------------------------------------------------------------
The reason I'm doing this: my stamp sets overfloweth!!! One day I'll post the disaster known as before and hopefully the wonderfully organized after.
Edit 08/06/2008 - Okay was doing my usual SCS viewing and came across this post again - I 'think' this is where I originally got this idea from so I want to make sure I give credit appropriately: http://www.splitcoaststampers.com/forums/showpost.php?p=9639430&postcount=2.
2 comments:
great idea never thought of that before
So to update myself 2 years later, it is easier for me to scan and do a reverse side next to it to mount against (or stamp the image twice) then to make the boxed index sheet :).
Post a Comment