Thursday, October 30, 2008

Project for daycare

I made a bunch of these tonight for my son's day care friends. I used the Top Note die (which I love)! I don't know how I fooled myself into thinking for the longest time that I did not need a Bit Shot. I'm totally in love with it!!


Supplies:
Cardstock: Tangerine Tango, Whisper White
Ink: Basic Black, Kiwi Kiss
Ribbon: 1/4" Basic Black Grosgrain
Stamp Set: Eat, Drink & Be Scary
Tools: Big Shot w/Top Note die
Misc: Sticky Strip, Clear bag, & Nemo gummies

Hint: I saw a sample in our magazine using the Eat, Drink, & Be Scary stamp w/o the border around it. The first pilot one I did, I used a marker. When I sat down to make it tonight, I thought I was going to go crazy doing that to make 17 of them and I realized I could make a mask and then use an ink pad. That saved so much time!!!

Friday, October 24, 2008

Birthday Cards

I have a birthday party to attend tomorrow for two little girls that are turning two! I made two birthday cards which I CASED from a card found on the web by a lady named Ruth Hinds. I only changed a little bit of the dimensions and the image that was used.


I need to make a few more of these to have on hands for birthdays! My only sad part is that this paper is retired and I'm a paper hoarder so it is going to be hard to part with this paper!

Monday, October 13, 2008

Halloween Prep & Stuff

So here is a picture of the card I made for the 100 card swap that I had joined. I didn't think this was going to be hard to make, but after making 100 - I realized differently!!! Wow, the swaps I got back though were just AMAZING. Everyone did such a fabulous job. I actually had issues getting mine done and wouldn't have if my husband hadn't actually ended up helping me assemble at the end. I had started having really horrible morning sickness (all day!) after I signed up for the swap and was sick for over a month and then ended in a horrible cold / cough / chest congestion for over another month (which I'm still recovering from).

Okay- so here is the picture of the swap using the new SU set Two Cool Dudes. It was based on the sample shown in the catalog with a bit more embellishment:


Here are some of the other stuff I made to send to the hostess as both a thank you and an apology because I was short 2 for the swap (I can't count) and it took me forever to get them out the door because of said illness above.

Top Note - Halloween - this is the front and back of what I did with the top note. The ribbon is more green, but it didn't show up in the picture too well. The front was from the SU samples using the new stamp set and the back is using a Sizzix Halloween Die. I think this is what I'll be using to give to my son's classmates for Halloween.

Halloween card we made at my UL's camp and I CASE'd it. I love this card and the candy corn is made with Crystal Effects for dimension. I really like CE - just takes awhile to dry!


Simple Card - This was based on a card we made maybe a year ago at my 5 level up's event. I liked how simple it comes out, although its not quite as quick to make!


The colors of this card was inspired from the same event as the card above. I would never have thought to do this combination on my own. The different layers were inspired on cards on SCS. I love those ribbon sliders!


This card I just gave away as a birthday card. We made this at my UL's house a long time ago when Crab & Co was first in a mini. I'm so glad they brought this set back - I didn't buy it when it was in the mini, but you better believe I have it now! Now that I've given this card away, I've gotta make another one to replace it :)

Wednesday, August 6, 2008

Best Upline Ever!

My UL is awesome! :) She ordered the catalog (I'm only getting 1/2 a box from her) and it arrived yesterday. I was bummed because we were going to be in the Tysons area last night, but not able to get all the way to her place. Well she ended up coming out to Tysons and had my new catalog with her!! Sweet sweet joy - I LOVE all the new stuff!!!!!

Thursday, July 31, 2008

Unmounting Instructions

Alright, so here is how I unmount my stamps - I did tons of research on SCS on the different options before deciding on this path with my added twist to use the stickers.

Please note the following disclaimer: I make no claims on how well this method works for anyone else but me. If you intend to use this method, I suggest doing a test batch first as I've only had time to really use my method for a few weeks so I make no claims on the long lasting effect of this method and touch-ups of the adhesive may be necessary.

This is also a very time consuming process - although most of it is due to my neurotic nature and needing the index sheet just right for me.

If you end up using this method please drop me a comment and let me know, I'd love to hear how it worked for you.

------------------------------------------------------------------------------------------------


Step 1: Unmount the stamp from the woodblock
(This can be skipped if you are using brand new unmounted rubber - which actually works the best). You can remove the rubber from the wood and if it is really stuck, stick it in the microwave and zap it for a few seconds.

(Note: Click on any image to get a closer view)

------------------------------------------------------------------------------------------------

Step 2: Apply the tombo multi pretty liberally to the foam side of the stamp. Remove the sticker from the wood block and adhere it to the rubber. Make sure you use enough glue as you do not want your sticker to stick to your acrylic block later. Make sure you join the two pieces together before the glue dries as you want to use the permanent adhesive.


------------------------------------------------------------------------------------------------

Step 3: Apply adhesive to the sticker and let dry (this is to use the repositionable version of the adhesive). I like to apply a second coat after it has dried to give it a little better sticking power. Make sure all layers are completely dried before using it on an acrylic block.


------------------------------------------------------------------------------------------------

Step 4: Make the index sheet
(I debated many methods on doing this, including using the scans of the sticker sheet before deciding on this method. I wanted to be able to see the stamped image next to my image so I don't have to look for it backwards and I wanted to know what goes where when I'm done. The most complicated part is making the boxes sized to fix the different sized stamps. (At the Races was a pain to do!). At the end though I'll have a nice collection of templates to use (I told my UL, I'd share it w/her if she ever decided to go this route).


------------------------------------------------------------------------------------------------

Step 5: Laminate
This took awhile to figure out how to do. My xryon was making a mess of putting two layers together. Then I discovered Xyron sells just straight up laminate sheets w/o using the machine. This also took some practice and now I have it down - just make sure to use a ruler to smooth it out as you laminate. The completed project and other samples:


------------------------------------------------------------------------------------------------

I have to say I love this method and it works great for ME!! This is what I used to make my swaps for convention. I was able to get the boat and the sentiment on one block. The concidence was that the block was the exact same size as the layer as I was stamping on. I love having the sticker sheet on it where I can see it so I feel like I'm getting straighter images.


------------------------------------------------------------------------------------------------

Alternative:
This is the other way to do it with the EZ Mount Thin: it is a MUCH QUICKER method, but I just can't seem to make myself go this route. Although now I have 40 sheets of ezmount eep!


------------------------------------------------------------------------------------------------

The reason I'm doing this: my stamp sets overfloweth!!! One day I'll post the disaster known as before and hopefully the wonderfully organized after.

Edit 08/06/2008 - Okay was doing my usual SCS viewing and came across this post again - I 'think' this is where I originally got this idea from so I want to make sure I give credit appropriately: http://www.splitcoaststampers.com/forums/showpost.php?p=9639430&postcount=2.

Sunday, July 27, 2008

Swap Details

The Swap:
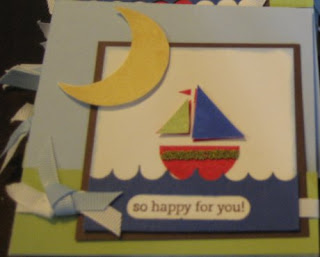
(I think I need to put a SU trademark or logo on here though - going to research now)

I'm pretty excited about this swap - I worked really hard on getting the design right and putting a lot of effort into making a good convention swap quality. I hope the recipients are not disappointed. If you are here visiting my page as a result of receiving my card as a swap, please drop me a comment and let me know how you liked it (but please be gentle with my feelings)!

Idea:
The first challenge was finding a stamp set that wasn't retired in my collection that I could work with. I debated between Priceless and this set. Eventually this set won out with the design idea.

Inspirations:

So the inspiration for this swap came from two different sources. It was originally supposed to be a a traditional size card for 4.25 x 5.5 based on a card I had received from my SCS Demo Secret Sis in one of the rounds. Michelle is just awesome and I love her work!!!! Try as I could, I could not get this card to really work with the bigger layout as it left a lot of space that I was trying to fill with things such as the little star in versamark or in more blue. Neither really turned out too well so I did some research on SCS and read up on square card sizes which is what I ended up with. The 3-D effect of the boat came from the SCS gallery for this stamp set.

Supplies:
  • Stamp Set:
    • Nursery Necessities
  • Cardstock:
    • Bashful Blue (4.25 x 4.25)
    • Certainly Celery (4.25 x 1.25)
    • Chocolate Chip (3.25 x 3.25)
    • Whisper White (3 x 3)
    • Brilliant Blue - Textured (3 x 1.25)
    • Whisper White or So Saffron for the moon cutout.
  • Inks:
    • Real Red
    • Brilliant Blue
    • Certainly Celery
    • Chocolate Chip
    • So Saffron
  • Ribbons:
    • 1/4" Grosgrain: Whisper White
    • 1/4" Grosgrain: Bashful Blue
  • Miscellaneous:
    • Word Window Punch
    • Snail Adhesive
    • White Pen
    • Paper Snips
    • Stampin' Dimensionals
    • Green Bead Duo (only on some cards)
Variations:
This card was pretty easy to use for covering up mistakes. For instance, some of the cards have the small beads from the green bead duo on the bottom piece of the boat as the white pen didn't provide consistent coverage. I also used So Saffron on either Whisper White or So Saffron for the sun. I ran out of textured Brilliant Blue CS for the last few so some of them may be just pain Brilliant Blue.

Tips, Tricks, and Lessons Learned:
  • Dimensionals were easier to use when they were cut up in half and the edges also were not wasted.
    • Better trick is to actually cut up a whole strip of the dimensionals in half before even unpeeling the first layer.
  • Make a guide for the word window punch on a bigger sheet of cardstock and just secure the smaller wave ones onto it and punch.
  • Mark the bottom of the punch with a small piece of tape/cs so the waves can be punched at consistent places easier.
  • It took a LONG time to cut and assemble all of the pieces, way more then I was thinking it would.
  • So I don't usually use my textured CS (I'm more of a hoarder of supplies then a user), so I didn't realize until I was half way through that there is a front and a back of the textured CS. So some of the Brilliant Blue may be using the wrong side - sorry!
Last thoughts:
I did show my husband my card and he wondered A) why I was spending all this time on these swaps instead of doing my graduate homework. B) Why I used a moon when it looked like it was day light out. This second piece has really made me question the design. I had to explain to him that I didn't have any Sun stamps that weren't retired. He said you didn't have any circles? Anyway, it was difficult to explain. I debated using the star stamp and star punch which would've been a lot easier then cutting up those moons, but I liked the moon better.

Thanks to Marilyn for being such a good friend to take my swaps for me!!!!

My Convention Swaps

Well, I'm not going to Convention this year. My UL and I thought very hard about this and we were very tempted to go as this was the 20 year celebration and we wanted to see the new catalog! However, after we priced out - we decided that the money would be better spent on new stamp sets! I do have a friend that is going and I'm very thankful that she was willing to do some swapping for me. I've spent the past few days doing nothing but making these swaps and boy am I exhausted. I'm only sending 45 off to be swapped and keeping 2. The original goal was to make 50 but this was close enough. The output is above and I'm pretty pleased with how they turned out, I'll make another post with the instructions and details.

Thursday, July 24, 2008

Hello World!

Another blog?!?! Seriously, you are asking yourself how many blogs does a girl really need? Well I'm hoping to keep the focus of this one strictly on the happenings of my stamping projects.

The first order of business is my office / craft room is a disaster!! I'm in the process of switching over to unmounted in order to alleviate the mess. I'll post some pictures of the process as we go along.